How to use Tables in Microsoft Word
Here, we Get information how we can use and work and insert Tables in Microsoft Word.
Do you have similar website/ Product?
Show in this page just for only
$2 (for a month)
0/60
0/180
How to Use and Insert tables in Microsoft Word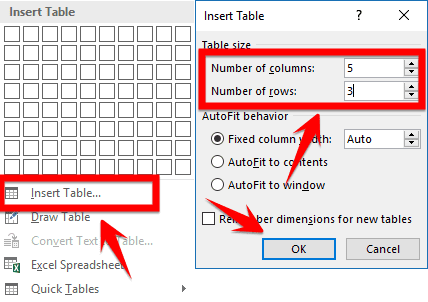
Aligning text in a word processing document can be tedious if you try to do it using tabs and spaces. With Microsoft Word, you can insert tables in your document to align columns and rows of text with ease.
If you've never used Word's tables feature before, it can be intimidating to know where to start. Even if you have used the tables feature, you can find new ways to use it more effectively.
There are several ways to insert a table in Microsoft Word. The three that are the easiest for beginners to use right away are the Graphic Grid, Insert Table, and Draw Table methods.
Graphic Grid Method
- With a Word document open, click Insert on the ribbon and click the Table icon to open the Insert Table dialog box, which contains a grid.
- Click in the top left corner of the grid and drag your cursor to highlight the number of columns and rows you want in the table.
- When you release the mouse, the table appears in the document and two new tabs are added to the ribbon: Table Design and Layout.
- In the Table Design tab, you style the table by adding shading to some rows and columns, select a border style, size and color and many other options that control the look of the table.
- On the Layout tab, you can change the height and width of cells, rows or columns, insert additional rows and columns or delete additional rows and columns, and merge cells.
- Use the Table Design and Layout tabs to style the grid exactly as you want it to look
- Open a Word document
- Click Table on the menu bar.
- Select Insert-> Table on the drop-down menu to open the Autofit dialog box.
- Enter the number of columns you want in the table in the field provided.
- Enter the number of rows you want in the table.
- Enter a width measurement for the columns in the Autofit Behavior section of the Insert Table dialog or leave the field set to autofit to generate a table the width of the document.
- The blank table appears in the document. If you want to add or delete rows or columns, you can do it from the Table-> Insert drop-down menu.
- To change the width or height of the table, click on the lower right corner and drag to resize it.
- The Table Design and Layout tabs appear on the ribbon. Use them to style or make changes to the table.
- With a Word document open, click on Insert on the ribbon.
- Click the Table icon and select Draw Table, which turns the cursor into a pencil.
- Drag down and across the document to draw a box for the table. The dimensions aren't critical because you can easily modify them.
- Click inside the box with your cursor and draw vertical lines for each column and horizontal lines for each row you want in your completed table. Windows places straight lines in the document for you.
- Style the table using the Table Design and Layout tabs.
No matter which of these methods you use to draw your blank table, you enter text in the same way. Just click in a cell and type. Use the tab key to move to the next cell or the arrow keys to move up and down or sideways within the table.
If you need more advanced options, or if you have data in Excel, you can embed an Excel spreadsheet in your Word document in place of a table.
CONTINUE READING
How to use Tables in Microsoft Word
How to insert Tables in Microsoft Word
Graphic Grid Method
Insert Table method
Draw Table method
Software- Microsoft Office- Microsoft Word
How to use and insert tables in Word.
Kinnari
Tech writer at NewsandStory